
和風なサイトを作ってるんだけど、いまいちしっくりこないな~

どんなデザインですか?

温泉の写真がどーんとあって、その上に「温泉同好会」の文字が乗ってるやつです。

文字を縦書きにしてみたらどうですか?

た、縦書き……??
縦書きの効果
「和」をアピールしたいのに、文字が横書きだといまいちですよね。
見出しなどの目立つ部分に縦書きを用いると、日本らしさが増します。
たとえば、画像の上に文字を重ねてみると、
See the Pen vertical_picture by spica (@spica_blog) on CodePen.


たしかに和の雰囲気が出ますね!

旅館や日本料理店、和菓子屋さんなどのサイトで
縦書きを見かけることが多くなりました。
では、どうすれば縦書きが実現するのでしょうか。
縦書きの指定
実は、縦書きにすることは難しくありません。
下のサンプルは、<p>タグを3つのシンプルなHTMLです。
分かりやすいようにブロックごとに色分けしてあります。
See the Pen test-horizontal by spica (@spica_blog) on CodePen.
「writing-mode: vertical-rl;」で縦書きに
上のサンプルのCSSに、「writing-mode: vertical-rl;」IE未対応と付け加えます。
html {
  -webkit-writing-mode: vertical-rl;
      -ms-writing-mode: tb-rl; /* IE,Edge用 */
          writing-mode: vertical-rl; /* Chrome,Safari,Opera用 */
}
すると、
See the Pen test-vertical by spica (@spica_blog) on CodePen.
見事、縦書きになりました!

たったこれだけでできちゃった!!

簡単でしたね。
でも、よく見てみてください。
コンテンツがやけに横長になっていませんか?

ほんとだ……。
巻物みたいになってる……。
「writing-mode」を指定する要素
文書全体を縦書きにしたい場合、「writing-mode」はhtml要素に指定します。
しかし、ブロック要素が右→左に並んでしまい、巻物のように横に続いていってしまうのです。
マウスでスクロールできるのは、通常上下方向になりますので、横スクロールは不便です。
ですから、「writing-mode」を文書全体に指定するのは避けたほうがいいと思います。
ポイントごとに「writing-mode」を指定すれば、レイアウト崩れを防げますし、サイトのアクセントにもなります。
「writing-mode」をブロック要素に指定してみると…
See the Pen test-h&v by spica (@spica_blog) on CodePen.
ブロックは縦積み、文字は縦書きになりました。
ポイントはwidthとheightを指定すること。
widthとheightは、writing-modeを指定しても回転したりせずにそのままの状態がキープされます。
予期せぬレイアウト崩れが防げるようになります。
「column-count」で段組みしてみると…
しかし、<p>タグごとにwriting-modeを指定するのはあまり良い方法とは思えません。
そのため、「column-count」で段組みをしてみました。
See the Pen test-column by spica (@spica_blog) on CodePen.
.column {
  -webkit-writing-mode: vertical-rl;
      -ms-writing-mode: tb-rl;
          writing-mode: vertical-rl;
  -webkit-column-count: 2;
     -moz-column-count: 2;
          column-count: 2;
  -webkit-column-gap: 20px;
     -moz-column-gap: 20px;
          column-gap: 20px;
  height: 600px;
  margin: 0 auto;
  text-indent: 1em;
  padding: 15px;
}
長い文章を小説のようにレイアウトできました!

和風サイトだからって、全部縦書き!っていうのはよくないんですね……。

タイトルやボタンなど、アクセント的に使うのがいいですよ!
「writing-mode」「column-count」「column-gap」はベンダープレフィックスの指定が必要です。
-ms-writing-mode: tb-rl; ⇒IE,Egde
-webkit-writing-mode: vertical-rl; ⇒Chrome,Safari,Opera
-ms-writing-mode: vertical-rl; ⇒FireFox
ブラウザの対応については、下記のリンクからご確認ください。
https://developer.mozilla.org/ja/docs/Web/CSS/writing-mode
自動的にベンダープレフィックスを付けてくれるオンラインツールもあります。
https://autoprefixer.github.io/
縦書きの細かな設定
縦書きがうまくできたところで、文字の向きも変更してみましょう。
See the Pen vertical by spica (@spica_blog) on CodePen.
<div>
  <p class="mixed">4月はSpring</p>
  <p class="upright">8月はAugust</p>
  <p class="sideways">10月はOctober</p>
  <p class="mixed"><span class="all">11</span>月はNovember</p>
</div>
.mixed {
text-orientation: mixed;
}
.upright {
text-orientation: upright;
}
.sideways {
text-orientation: sideways;
}
.all {
text-combine-upright: all;
}文字の向きを変える「text-orientation」
縦書き文章の場合、英数字は横に倒れて表示されます。
文字の向きを変えるプロパティは、「text-orientation」IE未対応で、英数字を縦向きにするのなら値を「upright」と指定します(初期値はmixed)。
text-orientation: upright;文字を横にするのなら値を「sideways」と指定します。
text-orientation: sideways;縦中横「text-combine-upright」
「10」などの2桁の数字を1文字として扱うことができます。1文字として組み合わせたい文字を<span>タグで囲んで使用します。
「text-combine-upright: all;」Edge未対応と指定すると、<spna>タグで囲まれた文字が縦中横になります。
<p class="mixed"><span class="all">11</span>月はNovember</p>text-combine-upright: all;ルビと装飾線
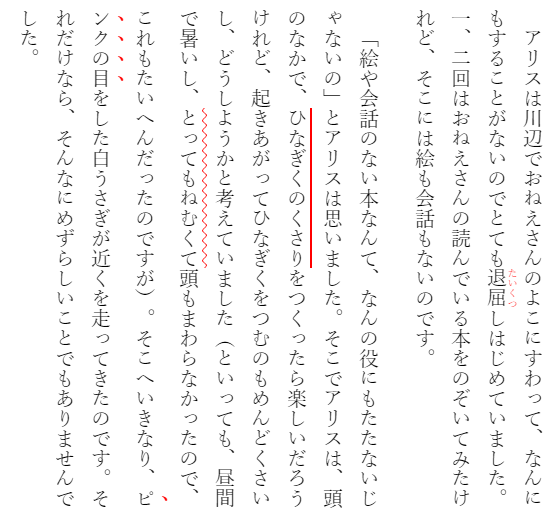
See the Pen vertical-rl by spica (@spica_blog) on CodePen.
ルビ
文字にふりがな(ルビ)を振る時は、<ruby>タグを用います。ルビ部分を<rt>で囲い、</ruby>で閉じます。
<ruby>退屈<rt>たいくつ</rt></ruby>rt {
color: red;
}装飾線
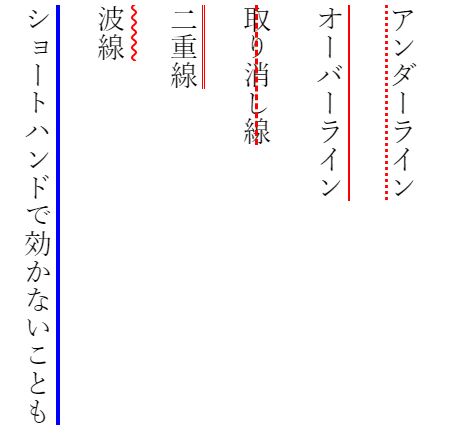
テキストに装飾的な線を付けたい時に「text-decoration」IE未対応を指定します。
「text-decoration-line」IE未対応には、線の装飾位置(underline,overline,line-through,none)を指定します。
「text-decoration-color」IE未対応には、線の色を指定します。
「text-decoration-style」IE未対応には、線の種類(solid,double,dotted,dashed,wavy)を指定します。
「text-decoration-thickness」IE未対応には、線の太さを指定します。
See the Pen mac line by spica (@spica_blog) on CodePen.
.underline {
  -webkit-text-decoration-line: underline;
          text-decoration-line: underline;
  -webkit-text-decoration-style: dotted;
          text-decoration-style: dotted;
  -webkit-text-decoration-color: red;
          text-decoration-color: red;
}
.overline {
  -webkit-text-decoration-line: overline;
          text-decoration-line: overline;
  -webkit-text-decoration-style: solid;
          text-decoration-style: solid;
  -webkit-text-decoration-color: red;
          text-decoration-color: red;
}
.line-through {
  -webkit-text-decoration-line: line-through;
          text-decoration-line: line-through;
  -webkit-text-decoration-style: dashed;
          text-decoration-style: dashed;
  -webkit-text-decoration-color: red;
          text-decoration-color: red;
}
.double {
  -webkit-text-decoration-line: overline;
          text-decoration-line: overline;
  -webkit-text-decoration-style: double;
          text-decoration-style: double;
  -webkit-text-decoration-color: red;
          text-decoration-color: red;
  text-decoration-thickness: 1px;
}
.wavy {
  -webkit-text-decoration-line: overline;
          text-decoration-line: overline;
  -webkit-text-decoration-style: wavy;
          text-decoration-style: wavy;
  -webkit-text-decoration-color: red;
          text-decoration-color: red;
  text-decoration-thickness: 2px;
}
圏点
テキストに圏点を付けたい時に「text-emphasis」IE未対応を指定します。
「text-emphasis-style」には、圏点の形を指定します。値にはfilled,dot,open,circle,double-circle,triangle,sesame,noneがあります。
「filled(単色塗りつぶし、既定値)」か「open(中抜き)」を選択し、記号の形を選択します。
See the Pen text-emphasis by spica (@spica_blog) on CodePen.
.dot {
  -webkit-text-emphasis: filled dot red;
          text-emphasis: filled dot red;
}
.dot_open {
  -webkit-text-emphasis: open dot red;
          text-emphasis: open dot red;
}
.circle {
  -webkit-text-emphasis: circle red;
          text-emphasis: circle red;
}
.circle_open {
  -webkit-text-emphasis: open circle red;
          text-emphasis: open circle red;
}
.double-circle {
  -webkit-text-emphasis: filled double-circle red;
          text-emphasis: filled double-circle red;
}
.double-circle_open {
  -webkit-text-emphasis: open double-circle red;
          text-emphasis: open double-circle red;
}
.triangle {
  -webkit-text-emphasis: filled triangle red;
          text-emphasis: filled triangle red;
}
.triangle_open {
  -webkit-text-emphasis: open triangle red;
          text-emphasis: open triangle red;
}
.sesame {
  -webkit-text-emphasis: filled sesame red;
          text-emphasis: filled sesame red;
}
.sesame_open {
  -webkit-text-emphasis: open sesame red;
          text-emphasis: open sesame red;
}
縦書きの表
では、最後に表を縦書きしてしたらどうなるのかを見ておきましょう。
See the Pen vertical-table by spica (@spica_blog) on CodePen.
表も文字と同じように90度回転しました。
そのため、行と列の配置が入れ替わっています。
高さと幅も逆になっています。
ただし、「width」と「height」が指定してある時はうまくいきません。
See the Pen vertical-box by spica (@spica_blog) on CodePen.
前述のとおり、writing-modeでwidthとheightを指定すると、ブロック内の文字だけが回転し、widthとheightはそのまま維持されます。
table {
  width: 420px;
  height: 200px;
}
試しに、widthとheightを指定してみましょう。
See the Pen table-vertical2 by spica (@spica_blog) on CodePen.
縦書きの表は、形はそのままで、文字が縦書きに、行と列の配置が逆になっているのが分かりますね。
では、縦書きの表にだけ、widthとheightの値を逆に指定してみましょう。
table {
  width: 200px;
  height: 420px;
}See the Pen table-vertical3 by spica (@spica_blog) on CodePen.
今度はうまくいきました!

widthとheightは、あくまで見たままの幅と高さを指定すればいいんですね!

そうなんです、見たままでいいんですよ!
まとめ
今回は、CSSで縦書きを実現する方法を解説しました。
コツさえ掴めれば、難しいところはありません。
和風なサイトじゃなくても、アクセント的に縦書きを使うことで、目を引くデザインが作れます。
この記事を参考にして、ステキなウェブサイトを作ってみてください!

コメント